Configuring Workflows
Workflows are used with reporting packages to:
- Schedule when packages are launched
- Create the steps in the report package data collection and approval process
- Assign user roles that are responsible for each step
- Set due dates for the completion of each step
*Note* User roles must exist as each workflow step must be completed by a specific user role.
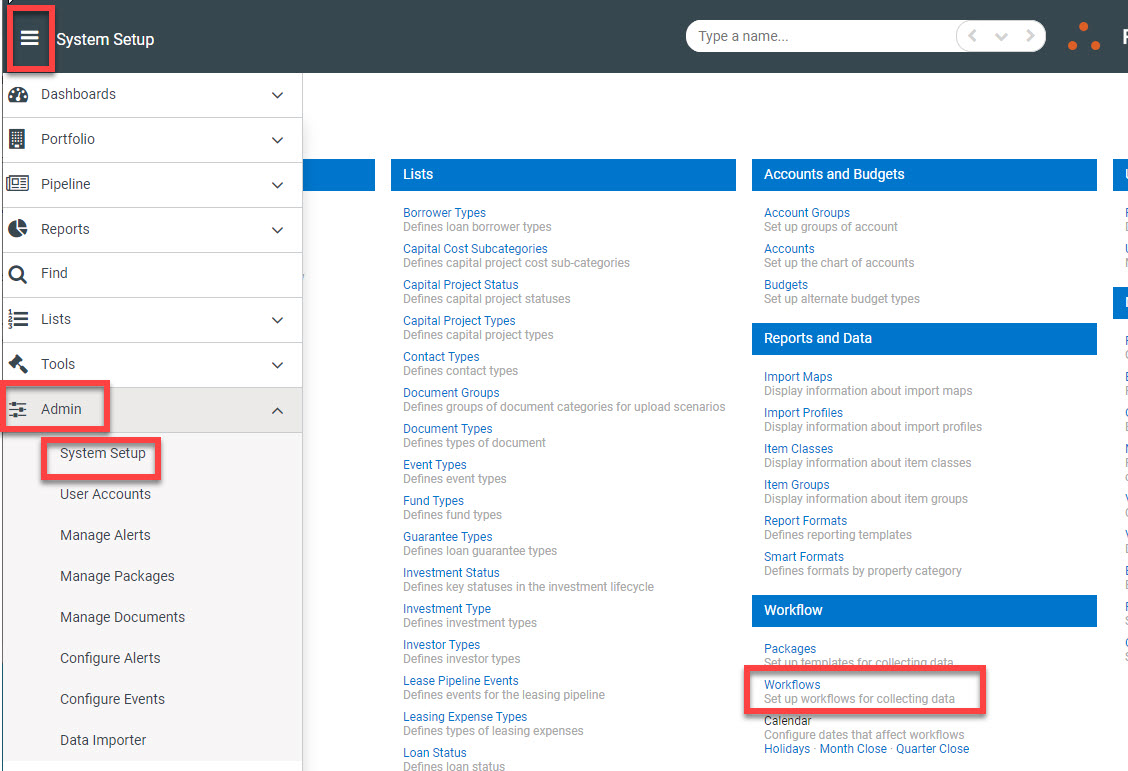
Workflows can be created by navigating to System Setup and clicking ‘Workflows’ under the Workflow section.
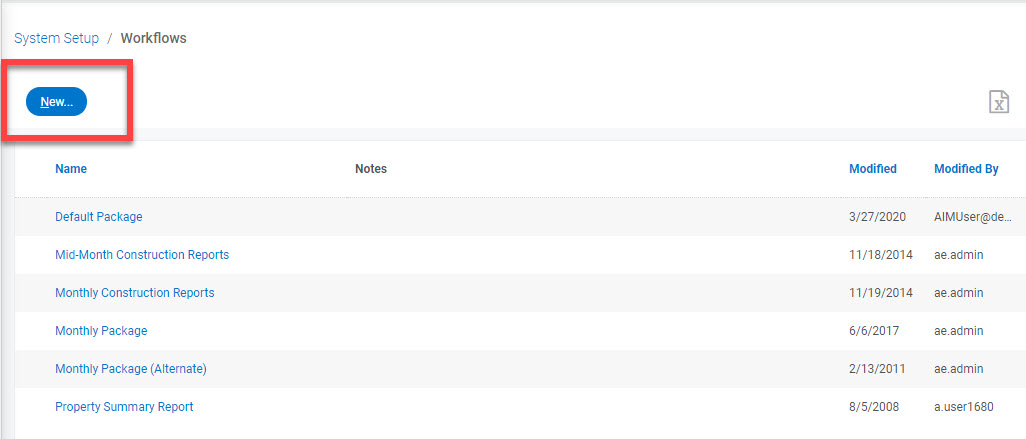
To create a new workflow that is not based on an existing workflow:
- Click the ‘New…’ button at the top of the page
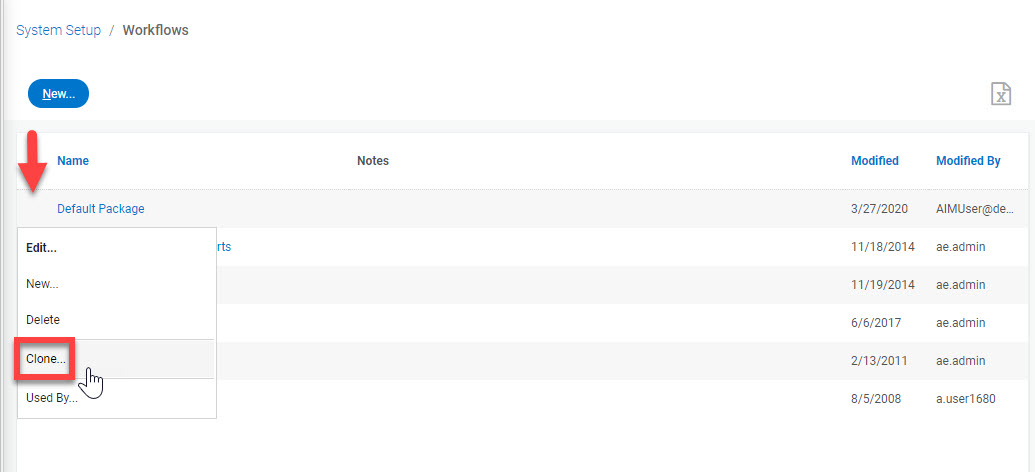
To clone an existing workflow:
- Place your mouse directly to the left of the package you want to clone
- Click the three dots menu that appears
- Select ‘Clone…’ to create a copy of the workflow
- Name the workflow in the resulting dialog screen that pops up
- Click the ‘OK’ button to accept the name and open the Workflow Details page

After clicking into the Workflow Details you’ll have the following fields to complete:
- Give the workflow a meaningful name.
- Describe the workflow (optional) using the Notes field
- Reject to Early Step Allowed – Select this option if you want to give the role performing the current step the ability to return the package back to any preceding step. Otherwise, the role can only return the package to the immediate preceding step.
- Define when the workflow should start. Refer to the ‘Workflow Start’ section below.
- Select an existing step to edit its details. Refer to the ‘Edit Options section below.
- Click the ‘New Step’ button to create a new workflow step. Refer to the ‘New Step’ section below.
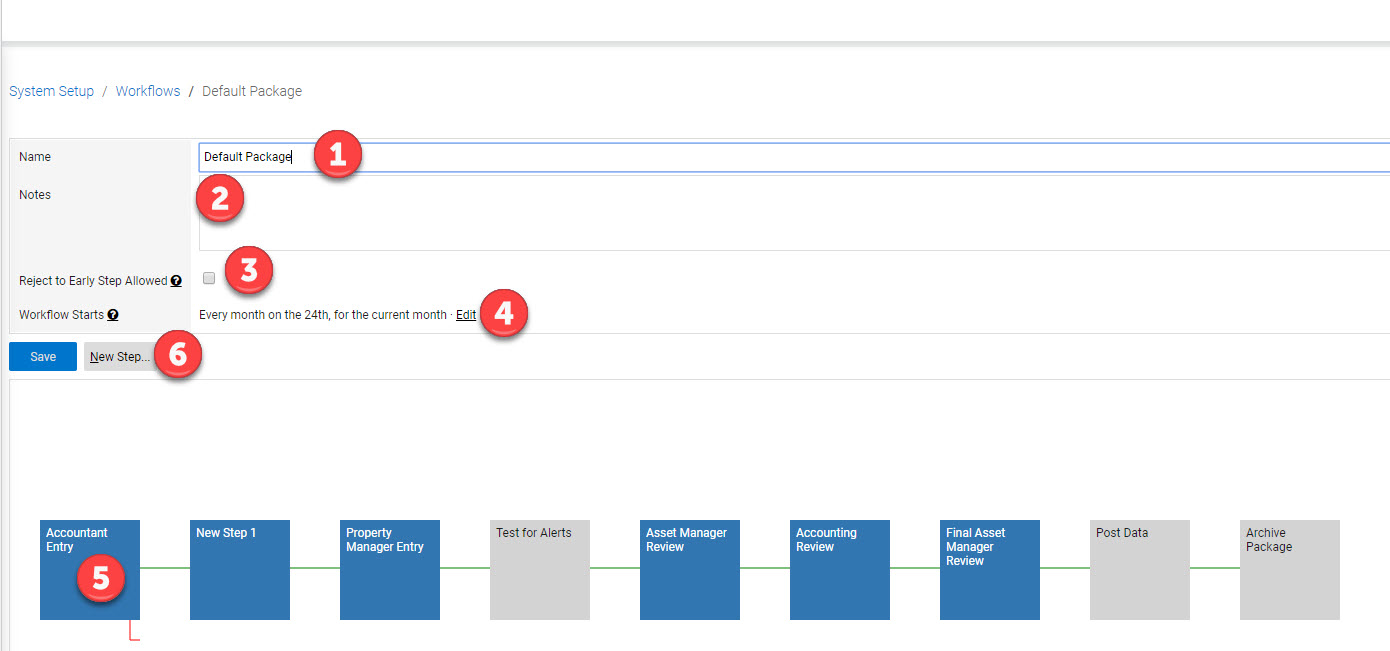
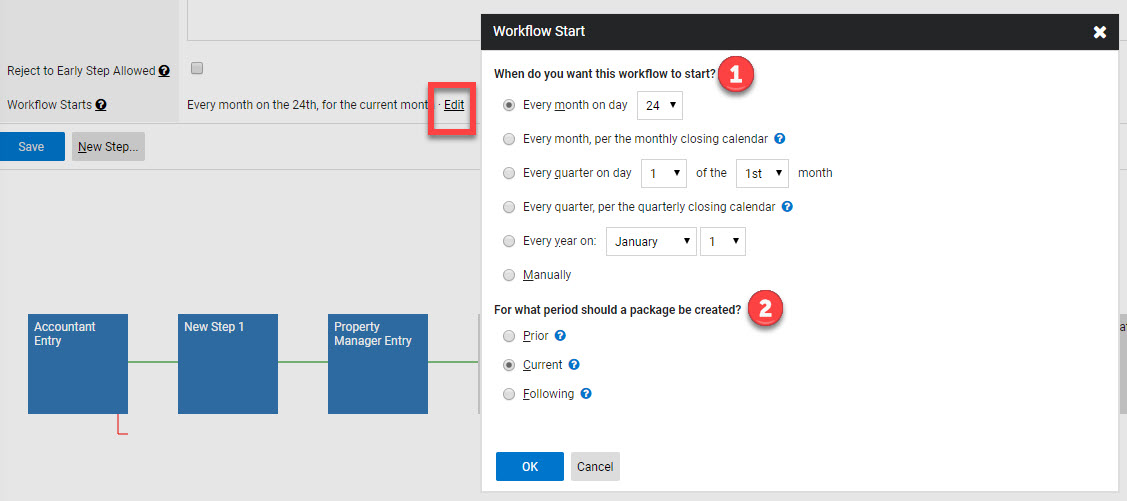
The ‘Workflow Starts’ setting is used to define when and how often the workflow starts.
- Specify the start date and frequency:
- Every month on day xx – This option indicates a monthly frequency and you specify the day of the month when the workflow starts.
- Every month per the monthly closing calendar – not used
- Every quarter on day ‘xx’ of the ‘yy’ month – Launch the workflow every quarter and specify the day of the month (xx) and the month of the quarter (yy). The month of the quarter is a relative month, either first, second or third.
- Every quarter per the quarterly closing calendar – not used
- Every year on: month and day – Indicates an annual frequency and the launch month and day must be specified
- Manually – Use this option to launch workflows without regular schedules
- Specify the package period. This period is relative to the workflow’s launch date.
- Select Prior if the package should be created for the period prior to the period the package launches. If the workflow launches on July 20th, the package will be created for June.
- Select Current if the package should be created for the same period the workflow launches
- Select Following if the package should be created for the period after the workflow launches.
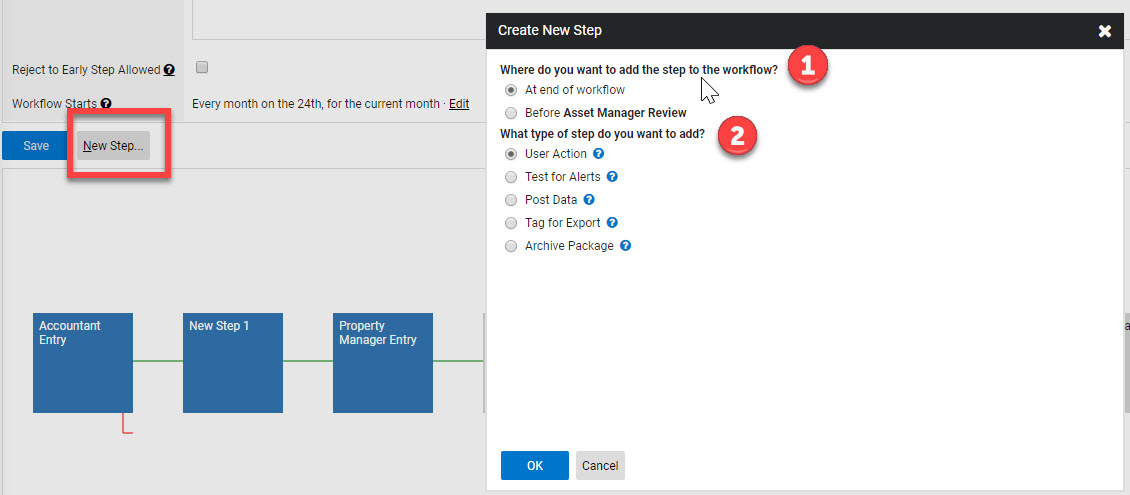
When the ‘New Step…’ button is clicked, the Create New Step dialog is displayed. The following actions can be taken:
- Indicate where to place the new step within the workflow. The default is to place the new step at the end of the workflow. There is an option to place the new step prior to the current last step. If neither of these options are correct, the step can be moved manually after it has been defined. Refer to the ‘Edit Options’ section below.
- Define the type of step – There are two types of steps, user defined and system. Select the User Action to define tasks that are to be completed by roles assigned to the property.
- Click ‘OK’ to create the new step and navigate to the step details dialog. Select ‘Cancel’ to disregard the new step.
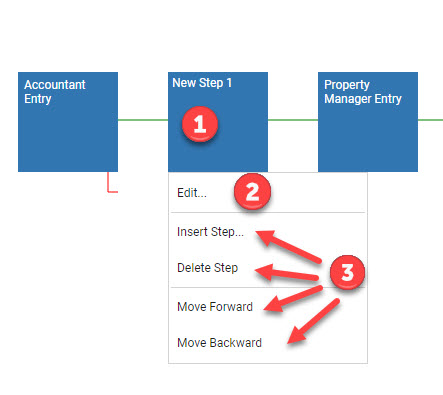
A context menu is displayed when a workflow step is clicked. The following actions can be performed from the context menu:
- Click on the rectangle representing the step to display a context menu containing the options for editing and placement of the step.
- Edit… - Open the ‘Step Details’ dialog. Information regarding the description of the step, who is responsible for completing it and the timing of the step is captured in this dialog. Refer to the ‘Step Details’ section below.
- Select one of the placement options to create a new step, delete the selected step or move it to a different location within the workflow.
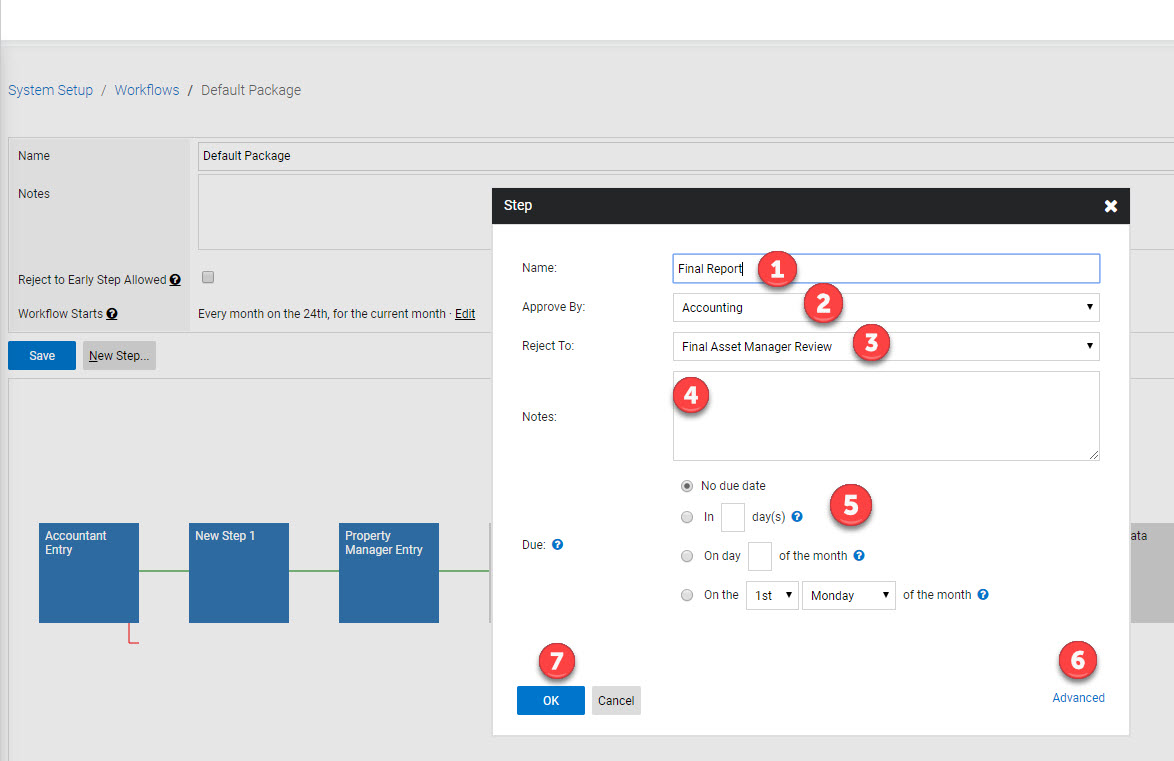
Workflows consist of one or more steps. Each step describes a specific activity to be taken on the package, its timing, and the parties responsible for completing the step. Complete the following for each step:
- Step Name – Give the step a name that describes the activity to be performed
- Approve By: - Specify the role on the property that is responsible for completing and approving the activity described by the step. When a step is initiated, either by the workflow launch or by the completion of a previous step, a notification/alert will be sent to all the people assigned to the role described on the step.
- Reject To: - Specify the step in the workflow where the package should be returned in the event that information is missing or incorrect. The step must be one of the previous steps in the workflow and is typically the step immediately preceding the current step. If the ‘Reject to Early Step Allowed’ option in the Workflow details page is specified, any previous step can be selected when the workflow is active.
- Notes – Add a narrative that describes the details of the step
- Due – Specifies when or how long the responsible party has to complete the step. Use one of the following options to specify when the step is due:
- No due date – use this option if the step does not have a due date
- In ‘x’ day(s) – specify the number of days (x) the responsible party has to complete the step
- On day ‘x’ of the month – specify a particular day (x) of the month when the step is to be completed. If the day is less than the launch day of the workflow, then the due day applies to the following month. If the day is greater than the number of days in the current month, then the last day of the month is used.
- On the ‘x’ ‘day of week’ of the month – Specify an occurrence (x) of a day of the week within a month (e.g.
- Advanced – Click this link to grant access rights to other user roles besides the role specified in the ‘Approve By’ dropdown (details further down).
- Click the ‘OK’ to save the step OR the ‘Cancel’ button to discard the changes.
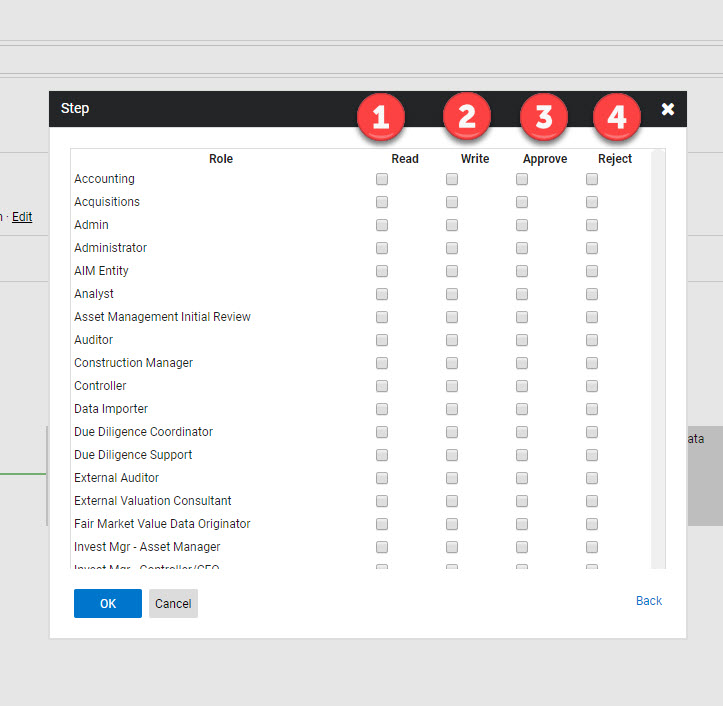
The ‘Advanced’ dialog allows access to the step to be defined at a more granular level than just specifying the role that can approve the workflow step. By default, the role with approval access has full access to the step. Use this dialog to grant access to other roles for this step. Access privileges are:
- Read – Allow the selected role to read the contents of the package when it is in the selected step of the workflow.
- Write – Allow the selected role to make changes to the contents of the package when it is in the selected step of the workflow.
- Approve – Allow the selected role to approve the package contents and move the package to the next step from the selected step of the workflow
- Reject – Allow the selected role to return the contents of the package to the previous step (or user selected prior step, if enabled) from the selected step in the workflow.